Total Pageviews

Tuesday, January 25, 2011

Some more yumminess to share. :-)

Creamy One-Pot Pasta

Creamy One-Pot Pasta
This one-pot wonder combines slivered garlic and fresh vegetables for a light pasta dish your family will be sure to request again.
Ingredients:

4   large garlic cloves, peeled
1   jar (7 oz) sun-dried tomatoes in oil, undrained
3   cans (14.5 oz each) chicken broth (5 1/4 cups)
1   lb uncooked penne pasta
1   head broccoli (2 cups small florets)
2   medium carrots, peeled
4   oz reduced-fat cream cheese (Neufchâtel)
1/4   tsp salt
1/2   tsp coarsely ground black pepper
   Grated fresh Parmesan cheese and snipped fresh basil (optional)
Directions:
  1. Thinly slice garlic using a paring knife. Place garlic and 1 tbsp oil from sun-dried tomatoes into (8-qt.) Stockpot. Cook garlic over medium heat 2-3 minutes or until garlic is golden brown, stirring occasionally. Remove from heat; add broth. Return to burner; increase heat to high. Cover and bring to a boil. Stir in pasta; cover and simmer vigorously 8-10 minutes or until pasta is almost cooked but still firm, stirring occasionally using a scraper.
  2. Meanwhile, cut broccoli into small florets; place into a mixing bowl. Cut carrots in half lengthwise; thinly slice crosswise on a bias. Drain sun-dried tomatoes; pat dry with a paper towel. Slice tomatoes into thin strips. Add carrots and tomatoes to mixing bowl.
  3. Cut cream cheese into cubes. Add vegetables, cream cheese, salt and black pepper to Stockpot. Stir until cream cheese is melted and fully incorporated. Reduce heat to medium; cover and cook an additional 2-4 minutes or until vegetables are tender. Serve immediately. If desired, top with grated fresh Parmesan cheese and snipped fresh basil
Delicious TROPICAL FRUIT SMOOTHIE

1 (14 ounce) can Sweetened Condensed Milk, Chilled
1 (8oz) container of plain yogurt (i actually used lemon flavored, mmmm yum)
2 1/2 cups of mixed fruit (I sliced up peaches, pineapple, cantaloupe, had some blueberries) 
I cut them earlier in the day then put them in a gallon sized ziploc bag and put in the freezer. Then made the smoothies after dinner.
2 tbsp of lemon juice (i didn't have lemon juice, but had a fresh lemon handy and squeezed fresh juice.)
1 1/2 cups of ice.

In blender add the above ingredients, except ice! Cover and blend until smooth. With blender running, gradually add ice, (yeah, if you can do that. I just turned mine off, then added and put cover back on.) Everyone's blender is different, so if you think yours will not make a mess, then I say go ahead and try. LOL
Blend until smooth, then serve immediately. Mine actually turned out real THICK so it was almost of ice cream milkshake consistency. I waited a few minutes, to let thaw a little and it was perfect to drink. 


So I made these last night to have after dinner as a dessert. Since I'm trying to go "HEALTHY" for the husband, i figured these would make a great treat instead of the usual cake, cookies, ice cream, etc. Now mind you, I LOVE the cakes, cookies, ice cream, etc. and that won't stop me from making them, but eating healthy is a good idea too. Besides, I love chocolate fudge Mother's cookies, oreos, chocolate cake, and other yummy goodness that I see out there. I used to be the SUGAR QUEEN when it came to desserts. 
Now my body doesn't show it, (THANK YOU DAD for the genetic metabolism) but I would order 2 desserts when going to restaurants.
1. This is me now:
 2. This was toothpick me in the 80's (Sorry Val, but this is the only old school pic I had available) :-)


3. And this is my dad:
And I'm sorry if this upsets the rest of you that I would not gain a pound, but I too would get tired of the teasing and the making fun of about how skinny I was. I was even told I could hoola-hoop in a cheerio in high school. (I still think that is funny to this day.) It is not my fault that God made me this way!! I love who I am and happy to be this person!! So enjoy the recipes and have a beautiful, awesome day!! I know I am!! Oh, and SMILE!!!




Thursday, January 20, 2011

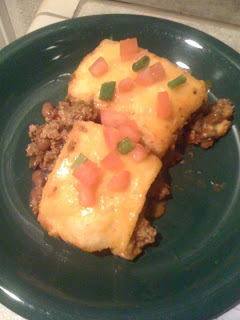
BLUEBERRY BANANA BREAD & CHIPOTLE CHILI CORNBREAD BAKE

     Well yesterday i got into a baking and cooking frenzy and felt like making some yummy food. My husband is trying to get back onto the Health Wagon, and I fully support him on that ride. Last year, he lost 100lbs due to many gallstone attacks and a few trips to the emergency room. He was trying to watch what he ate, so he would not have to have surgery. Well his gallbladder had another idea in mind. He had to have his gallbladder taken out middle of last year and he was told he would have to really watch what he ate!! Before the surgery, he did really well with the fat intake, watching sugar grams, etc., etc. Every time I go shopping now, I have to give myself some extra time, because I read just about every side panel to make sure I am getting the best ingredients and foods for him. (Plus fresh fruit and veggies are always at arms reach for us too!! Claryssa can grab fruit anytime, and she even like cucumbers!! It is her "new" favorite veggie!!)
      Wes also went to the gym every day, sometimes twice a day!! Well the last few months, we have both been slacking!! Noticed it was due to the holiday season. Well I was watching him one morning getting ready for work and I noticed a couple extra pounds must have creeped back on. With the stress from work, his boss, and some more hours that he has piled onto his plate, he has been too tired to go to the gym. Also eating right took a little bit of a back seat. So we both decided, we don't want him to slip back into the "old ways"!! He admitted he did gain back about 25 lbs, but this last week, he cut back on a bunch of the unhealthy foods, and watched his intake of food that he would eat every day. He told me that he even tried the "starvation diet" but we agreed that was not the right route!! 
He now snacks and eats small portions thru-out the day and eats a healthy dinner at night. So far, he lost 5 lbs. So now we just need to hit the gym. But anyways, I was going to post some yummy recipes but I had to give you a little glimpse of our life. Oh, and organic is not always the best. We love organic food, but looking at the nutrition facts on every box, has opened our eyes. Check them out for yourself too, you can be surprised.  Well, here are my 2 recipes for the day. The blueberry banana bread was sooo moist and delicious, Wes said he was really impressed!! He loved it!! I will also try to add a link from my friend Mara who has a healthier version of this, if you would like to try that out. 

BLUEBERRY BANANA BREAD
1/2 c. butter, softened
1 tsp. vanilla
1 tsp. baking soda
2 lg. ripe bananas, mashed
1/2 c. chopped nuts (optional)
1 c. sugar   (I would even change this up to 3/4 c. sugar & 1/4 c. brown sugar) To me, I felt the bread needed some brown sugar
2 eggs
1 1/2 c. flour
1/2 tsp. salt
1 1/2 c. blueberries, fresh or frozen  (I did 2 cups instead, that is why my bread looks a little darker)
Preheat oven to 325°F degrees.Grease and flour 2 loaf pans. Cream together butter and sugar. Beat in eggs. Add mashed bananas.
Measure flour, reserving 2 tablespoons of flour to coat blueberries.
Stir baking soda and salt into flour, mixing well. Fold into banana mixture. Stir in vanilla.
Sprinkle the 2 tablespoons flour over blueberries, then fold into batter. Stir in chopped nuts.
Transfer batter to loaf pans.
Bake about 50 minutes.
OH, AND I USED MY STONEWARE MINI LOAF PAN!! I LOVE THAT THING!!


HERE IS THE HEALTHIER VERSION:
Banana Blueberry Bread
recipe from Fat Free Vegan
3 large over-ripe bananas
2 tablespoons lemon juice
1/3 cup (80 ml) vanilla soymilk (or apple sauce)
1/2 cup (120 ml) agave nectar
2 cups (240 g) white whole wheat flour (or regular whole wheat flour)
3/4 teaspoon baking powder
3/4 teaspoon baking soda
1/2 teaspoon salt
1 cup (240 ml) blueberries
Preheat oven to 350F. Spray or wipe a 9×5-inch loaf pan with oil.
Mix the soymilk with 1 tablespoon of the lemon juice and let stand until it curdles. (If using apple sauce, skip this step and add the lemon juice to the bananas.)
In a large bowl, mash the bananas and add the remaining lemon juice, soymilk, and agave nectar. Stir well to combine. In a separate bowl, combine the flour, baking powder, soda, and salt. Add the dry ingredients to the banana mixture, and stir just until the mixture is well-combined. Fold in the blueberries.
Spread the mixture evenly in the prepared pan and bake until a knife inserted in the center comes out clean, about 50-60 minutes. Allow to cool before cutting and serving.

I hope you are all having a great weekend! Whip up this bread if you have some blueberries on hand. You can also substitute frozen blueberries for fresh (if you get to the blueberry fields late!!). Thanks for stopping by!!


Monday, January 17, 2011

Fun Projects Done For My Daughter :-)

So I am a little slow at blogging, but that is only due to me watching 3-4 kid's every day . Some days it could only be 1-2 children, but today was a total of 5 children, then I had a Pampered Chef conference call tonight as well. I was extremely busy last week, (somehow, don't know how it happened) and time just got away from me. So I finally have a chance to sit, enjoy a little quiet and share a couple of projects that I have done for my daughter. 
 The first was her Christmas present that she received in 2009 and that was her rocking chair that i painted and decorated for her. Of course it was from Santa Claus, so I had to hide and paint it secretly from her. So here is what I did, I was searching for a rocking chair, and couldn't find any for sale around here, and trust me, I looked at a ton of stores. Well I was in Michaels Craft Store and in their wooden craft section, I found a plain wooden rocking chair, that I thought was perfect!! I figured how hard could it be to paint it and decorate it. For me, it was not that hard at all. 

Project #1.
 I used the Americana Premium Acrylic Paint 8 oz btl (purple and black) to paint the chair. I did sand down the rough parts on the chair, to get a nice smooth finish, then commenced with the painting. I chose purple and black, because those are her favorite colors. Well at least black was at that time, but purple is still her favorite. I used a spray on lacquer after the paint was all dry to seal in the paint and to give her chair a little bit of a glossy finish to it. I then picked out some stickers from their sticker aisle that you can use for scrapbooks, photo albums, etc..  Sorry I do not have a before picture, but you get the idea. Well, on Christmas morning she was so excited and delighted that Santa picked out the perfect chair for her. So if you are wondering the price: the chair was $45-$50
    Pkg of stickers $3
     2 bottles of paint: $6 ea = $12  and we just had the spray on lacquer handy. So probably a total of $65-$70 for this project, which I think was well worth it. I got to personalize it more for my daughter and she loved it. Just to let you know, my mom found a rocking chair 6 months later for my niece that was plain white at JCPenney's or Sears for around $55 but I still think I got the better deal, because Claryssa got to tell me exactly what she wanted. 


Project #2.
 So my daughter received a pillow pet for her birthday and was so excited to have one like her cousin. Well of course we bring it home, she sleeps with it a couple of times, I take her to school and then come back to this: 
 YES, the eyes are gone!! I have a 8 mos old Jack Russel Terrier who loves to chew everything!! I found the eyes and even glued them back in, (because that is how they come any way, GLUED). Well of course Jaz took them out again and chewed them up some more. Good thing he did not swallow them. Well, I didn't like looking at her sad pillow pet now, so I thought what could I do to fix this?? Hmmmmm
Well, then I grabbed these items:
Yes, I used buttons and sewed them right in. After I did it, it looked like this:
Now if any of you have seen the animated movie Coraline, this creeped me out a little, but at least her pillow pet could "see" again. When Claryssa saw it for the first time with the "new" eyes, she was very happy her bumblebee could see again so he could "fly". :-)


Project #3.

So my daughter loves having a clean room. Weird for a 5 yr old right???? Well this is a small glimpse of what her room looks like:
 Pretty clean, right?? Well she is now becoming a Barbie fanatic and I just pulled them all together and she has a total of 14 so far. Well some of them got put into a bag, stuffed into the closet, a couple of shoes have been lost, as well as some clothes. Well she received more this last Christmas and for her Birthday and they took over her vanity table. So I decided to keep this well organized daughter of mine just a little more organized.
So this is what I bought:

The shoe holder was only $7 and the 2 pkgs of stickers was $2 each. So a total of $11.
So then next, we took those stickers to decorate the shoe holder like this:
 We hung it on her bedroom door, then we have the finished product like this:
 Now all her Barbies are at easy access for her, she can pull out the accessories and clothes that she needs, and then put them all away where she found them, to still keep her room organized and clean!! ;-) 
So this is what I have for you today, I am probably going to start doing recipes here soon. Just thought I would throw my little crafty side in here. But like I say, Smile!! Life is WHAT YOU make it!! I made these projects and they were fun to do and they made my daughter smile!! Thanks for reading and have a great day!! 

Friday, January 7, 2011

New Year's Resolution?? I don't do those, but I guess blogging is where I will begin!!

     So here it is day 7 of the new 2011 year, and after reading friends blogs and hearing about others I should go to and read or "check out", I decided I would start my own. Not sure who will take an interest in reading, but there are enough people in this small world of ours that I might just have 1 person that it might intrigue. 
    Where do I even begin?? I am a 36 yr old woman, who is still a child at heart, who has a wonderful husband and a beautiful 5 yr old daughter. I love reliving some of my childhood thru my daughter, but am realizing that I am becoming my mother (arrrgghhh) in other ways. I hear myself using the word "NO" too much, but I know it is for safety and other times, I'm just being plain stupid or mean. But this will all be another blog for a different day. 
      I don't really do scrapbooking, even though I have one and actually filled it out, but that was from the high school days. Maybe I will blog about that someday if I start. I actually cook/bake now and will more than likely post recipes, pics, and my thoughts on how it turned out, and how others may have liked them. 
That is the main purpose for me starting a blog, because I post everything on Facebook. I pretty much learned to cook on my own, since my mother was from the era of t.v. dinners, hamburger helpers and mac & cheese. She cooked a few meals, that I can slightly remember, but the only thing that ever stands out in my mind was cream of chicken covering baked chicken thighs or breasts with white rice and green beans. This is in no way badmouthing my mother, I just don't think she was ever really taught how to cook a lot of meals. I cooked a little in college then lost 13 years to working at KFC and just served fried chicken to everyone else. Starting around August 2008, is when I turned over to my own spatula and started making delicious foods of my own. Then in the summer of 2010 is when I became a Pampered Chef Consultant.
     So I am going to make this short for my introduction into Marci's life, but here are some topics I will probably blog about in the future:
cooking/baking
childhood soccer
my husband's band adventures
training for my Avon Breast Cancer Awareness Walk 2011 (this will be my 2nd year participating
parenting/childcare (and NO I'm not an expert)
and whatever else I decide to throw in because I feel like it or just can't think of at this moment.
So I need to take my husbands advice a little more sometimes and just laugh, joke and SMILE!!
Because life really is what YOU make it!!
So SMILE everyone and have a great day!!
Thanks for visiting my page. :-)